For web development as for any other task, one can leverage Common Lisp’s
advantages: the unmatched REPL that even helps to interact with a running web
app, the exception handling system, performance, the ability to build a
self-contained executable, stability, good threads story, strong typing, etc. We
can, say, define a new route and try it right away, there is no need to restart
any running server. We can change and compile one function at a time (the
usual C-c C-c in Slime) and try it. The feedback is immediate. We can choose
the degree of interactivity: the web server can refuse to handle exceptions
and fire the interactive debugger instead,
or handle them and print lisp backtraces on the browser, or display a 404
error page and print logs on standard output. The ability to build
self-contained executables eases deployment tremendously (compared to, for
example, npm-based apps), in that we just copy the executable to a server and
run it.
And when we have deployed our app, we can still interact with it, allowing for hot reload, that even works when new dependencies have to be installed. If you are careful and don’t want to use full live reload, you might still enjoy this capability to reload, for example, a user’s configuration file.
We’ll present here some established web frameworks and other common libraries to help you getting started in developing a web application. We do not aim to be exhaustive nor to replace the upstream documentation. Your feedback and contributions are appreciated.
Overview
Hunchentoot and Clack are two projects that you’ll often hear about.
Hunchentoot is
a web server and at the same time a toolkit for building dynamic websites. As a stand-alone web server, Hunchentoot is capable of HTTP/1.1 chunking (both directions), persistent connections (keep-alive), and SSL. It provides facilities like automatic session handling (with and without cookies), logging, customizable error handling, and easy access to GET and POST parameters sent by the client.
It is a software written by Edi Weitz (“Common Lisp Recipes”,
cl-ppcre and much more), it’s used and
proven solid. One can achieve a lot with it, but sometimes with more
friction than with a traditional web framework. For example,
dispatching a route by the HTTP method is a bit convoluted, one must
write a function for the :uri parameter that does the check, when it
is a built-in keyword in other frameworks like Caveman.
Clack is
a web application environment for Common Lisp inspired by Python’s WSGI and Ruby’s Rack.
Also written by a prolific lisper (E. Fukamachi), it actually uses Hunchentoot by default as the server, but thanks to its pluggable architecture one can use another web server, like the asynchronous Woo, built on the libev event loop, maybe “the fastest web server written in any programming language”.
We’ll cite also Wookie, an asynchronous HTTP server, and its companion library cl-async, for general purpose, non-blocking programming in Common Lisp, built on libuv, the backend library in Node.js.
Clack being more recent and less documented, and Hunchentoot a de-facto standard, we’ll concentrate on the latter for this recipe. Your contributions are of course welcome.
Web frameworks build upon web servers and can provide facilities for common activities in web development, like a templating system, access to a database, session management, or facilities to build a REST api.
Some web frameworks include:
- Caveman, by E. Fukamachi. It provides, out of the box, database management, a templating engine (Djula), a project skeleton generator, a routing system à la Flask or Sinatra, deployment options (mod_lisp or FastCGI), support for Roswell on the command line, etc.
- Radiance, by Shinmera (Qtools, Portacle, lquery, …), is a web application environment, more general than usual web frameworks. It lets us write and tie websites and applications together, easing their deployment as a whole. It has thorough documentation, a tutorial, modules, pre-written applications such as an image board or a blogging platform, and more. For example websites, see https://shinmera.com/, reader.tymoon.eu and events.tymoon.eu.
- Snooze, by João Távora (Sly, Emacs’ Yasnippet, Eglot, …), is “an URL router designed around REST web services”. It is different because in Snooze, routes are just functions and HTTP conditions are just Lisp conditions.
- cl-rest-server is a library for writing REST web APIs. It features validation with schemas, annotations for logging, caching, permissions or authentication, documentation via OpenAPI (Swagger), etc.
- last but not least, Weblocks is a venerable Common Lisp web framework that permits to write ajax-based dynamic web applications without writing any JavaScript, nor writing some lisp that would transpile to JavaScript. It is seeing an extensive rewrite and update since 2017. We present it in more details below.
For a full list of libraries for the web, please see the awesome-cl list #network-and-internet and Cliki. If you are looking for a featureful static site generator, see Coleslaw.
Installation
Let’s install the libraries we’ll use:
(ql:quickload '("hunchentoot" "caveman2" "spinneret"
                "djula" "easy-routes"))
To try Weblocks, please see its documentation. The Weblocks in Quicklisp is not yet, as of writing, the one we are interested in.
We’ll start by serving local files and we’ll run more than one local server in the running image.
Simple webserver
Serve local files
Hunchentoot
Create and start a webserver like this:
(defvar *acceptor* (make-instance 'hunchentoot:easy-acceptor
                                  :port 4242))
(hunchentoot:start *acceptor*)
We create an instance of easy-acceptor on port 4242 and we start
it. We can now access http://127.0.0.1:4242/. You should get a welcome
screen with a link to the documentation and logs to the console.
By default, Hunchentoot serves the files from the www/ directory in
its source tree. Thus, if you go to the source of
easy-acceptor (M-. in Slime), which is probably
~/quicklisp/dists/quicklisp/software/hunchentoot-v1.2.38/, you’ll
find the www/ directory. It contains:
- an
errors/directory, with the error templates404.htmland500.html, - an
img/directory, - an
index.htmlfile.
To serve another directory, we give the option :document-root to
easy-acceptor. We can also set the slot with its accessor:
(setf (hunchentoot:acceptor-document-root *acceptor*)
      #p"path/to/www")
Let’s create our index.html first. Put this in a new
www/index.html at the current directory (of the lisp repl):
<html>
  <head>
    <title>Hello!</title>
  </head>
  <body>
    <h1>Hello local server!</h1>
    <p>
    We just served our own files.
    </p>
  </body>
</html>
Let’s start a new acceptor on a new port:
(defvar *my-acceptor* (make-instance 'hunchentoot:easy-acceptor
                                     :port 4444
                                     :document-root #p"www/"))
(hunchentoot:start *my-acceptor*)
go to http://127.0.0.1:4444/ and see the difference.
Note that we just created another acceptor on a different port on the same lisp image. This is already pretty cool.
Access your server from the internet
Hunchentoot
With Hunchentoot we have nothing to do, we can see the server from the internet right away.
If you evaluate this on your VPS:
(hunchentoot:start (make-instance 'hunchentoot:easy-acceptor :port 4242))
You can see it right away on your server’s IP.
Stop it with (hunchentoot:stop *).
Routing
Simple routes
Hunchentoot
To bind an existing function to a route, we create a “prefix dispatch”
that we push onto the *dispatch-table* list:
(defun hello ()
   (format nil "Hello, it works!"))

(push
  (hunchentoot:create-prefix-dispatcher "/hello.html" #'hello)
  hunchentoot:*dispatch-table*)
To create a route with a regexp, we use create-regex-dispatcher, where
the url-as-regexp can be a string, an s-expression or a cl-ppcre scanner.
If you didn’t yet, create an acceptor and start the server:
(defvar *server* (make-instance 'hunchentoot:easy-acceptor :port 4242))
(hunchentoot:start *server*)
and access it on http://localhost:4242/hello.html.
We can see logs on the REPL:
127.0.0.1 - [2018-10-27 23:50:09] "get / http/1.1" 200 393 "-" "Mozilla/5.0 (X11; Linux x86_64; rv:58.0) Gecko/20100101 Firefox/58.0"
127.0.0.1 - [2018-10-27 23:50:10] "get /img/made-with-lisp-logo.jpg http/1.1" 200 12583 "http://localhost:4242/" "Mozilla/5.0 (X11; Linux x86_64; rv:58.0) Gecko/20100101 Firefox/58.0"
127.0.0.1 - [2018-10-27 23:50:10] "get /favicon.ico http/1.1" 200 1406 "-" "Mozilla/5.0 (X11; Linux x86_64; rv:58.0) Gecko/20100101 Firefox/58.0"
127.0.0.1 - [2018-10-27 23:50:19] "get /hello.html http/1.1" 200 20 "-" "Mozilla/5.0 (X11; Linux x86_64; rv:58.0) Gecko/20100101 Firefox/58.0"
define-easy-handler allows to create a function and to bind it to an uri at once.
Its form follows
define-easy-handler (function-name :uri <uri> …) (lambda list parameters)
where <uri> can be a string or a function.
Example:
(hunchentoot:define-easy-handler (say-yo :uri "/yo") (name)
  (setf (hunchentoot:content-type*) "text/plain")
  (format nil "Hey~@[ ~A~]!" name))
Visit it at http://localhost:4242/yo and add parameters on the url: http://localhost:4242/yo?name=Alice.
Just a thought… we didn’t explicitly ask Hunchentoot to add this
route to our first acceptor of the port 4242. Let’s try another acceptor (see
previous section), on port 4444: http://localhost:4444/yo?name=Bob It
works too ! In fact, define-easy-handler accepts an acceptor-names
parameter:
acceptor-names (which is evaluated) can be a list of symbols which means that the handler will only be returned by DISPATCH-EASY-HANDLERS in acceptors which have one of these names (see ACCEPTOR-NAME). acceptor-names can also be the symbol T which means that the handler will be returned by DISPATCH-EASY-HANDLERS in every acceptor.
So, define-easy-handler has the following signature:
define-easy-handler (function-name &key uri acceptor-names default-request-type) (lambda list parameters)
It also has a default-parameter-type which we’ll use in a minute to get url parameters.
There are also keys to know for the lambda list. Please see the documentation.
Easy-routes (Hunchentoot)
easy-routes is a route handling extension on top of Hunchentoot. It provides:
- dispatch based on the HTTP method, such as GET or POST (which is otherwise cumbersome to do in Hunchentoot)
- arguments extraction from the url path
- decorators (functions to run before the route body, typically used to add a layer of authentication or changing the returned content type)
- URL generation from route names and given URL parameters
- visualization of routes
- and more
To use it, don’t create a server with hunchentoot:easy-acceptor but
with easy-routes:easy-routes-acceptor:
(setf *server* (make-instance 'easy-routes:easy-routes-acceptor))
Note: there is also routes-acceptor. The difference is that
easy-routes-acceptor iterates over Hunchentoot’s *dispatch-table*
if no route is found by easy-routes. That allows us, for example, to
serve static content the usual way with Hunchentoot.
Then define a route like this:
(easy-routes:defroute my-route-name ("/foo/:x" :method :get) (y &get z)
    (format nil "x: ~a y: ~a z: ~a" x y z))
the route signature is made up of two parts:
("/foo/:x" :method :get) (y &get z)
Here, :x captures the path parameter and binds it to the x
variable into the route body. y and &get z define URL parameters,
and we can have &post parameters to extract from the HTTP request
body.
These parameters can take an :init-form and :parameter-type
options as in define-easy-handler.
Now, imagine that we are deeper in our web application logic, and we
want to redirect our user to the route “/foo/3”. Instead of hardcoding
the URL, we can generate the URL from its name. Use
easy-routes:genurl like this:
(easy-routes:genurl 'my-route-name :id 3)
;; => /foo/3

(easy-routes:genurl 'my-route-name :id 3 :y "yay")
;; => /foo/3?y=yay
Decorators are functions that are executed before the route body. They
should call the next parameter function to continue executing the
decoration chain and the route body finally. Examples:
(defun @auth (next)
  (let ((*user* (hunchentoot:session-value 'user)))
    (if (not *user*)
	(hunchentoot:redirect "/login")
	(funcall next))))

(defun @html (next)
  (setf (hunchentoot:content-type*) "text/html")
  (funcall next))

(defun @json (next)
  (setf (hunchentoot:content-type*) "application/json")
  (funcall next))
(defun @db (next)
  (postmodern:with-connection *db-spec*
    (funcall next)))
See easy-routes’ readme for more.
Caveman
Caveman provides two ways to
define a route: the defroute macro and the @route pythonic
annotation:
(defroute "/welcome" (&key (|name| "Guest"))
  (format nil "Welcome, ~A" |name|))

@route GET "/welcome"
(lambda (&key (|name| "Guest"))
  (format nil "Welcome, ~A" |name|))
A route with an url parameter (note :name in the url):
(defroute "/hello/:name" (&key name)
  (format nil "Hello, ~A" name))
It is also possible to define “wildcards” parameters. It works with
the splat key:
(defroute "/say/*/to/*" (&key splat)
  ; matches /say/hello/to/world
  (format nil "~A" splat))
;=> (hello world)
We must enable regexps with :regexp t:
(defroute ("/hello/([\\w]+)" :regexp t) (&key captures)
  (format nil "Hello, ~A!" (first captures)))
Accessing GET and POST parameters
Hunchentoot
First of all, note that we can access query parameters anytime with
(hunchentoot:parameter "my-param")
It acts on the default *request* object which is passed to all handlers.
There is also get-parameter and post-parameter.
Earlier we saw some key parameters to define-easy-handler. We now
introduce default-parameter-type.
We defined the following handler:
(hunchentoot:define-easy-handler (say-yo :uri "/yo") (name)
  (setf (hunchentoot:content-type*) "text/plain")
  (format nil "Hey~@[ ~A~]!" name))
The variable name is a string by default. Let’s check it out:
(hunchentoot:define-easy-handler (say-yo :uri "/yo") (name)
  (setf (hunchentoot:content-type*) "text/plain")
  (format nil "Hey~@[ ~A~] you are of type ~a" name (type-of name)))
Going to http://localhost:4242/yo?name=Alice returns
Hey Alice you are of type (SIMPLE-ARRAY CHARACTER (5))
To automatically bind it to another type, we use default-parameter-type. It can be
one of those simple types:
'string(default),'integer,'character(accepting strings of length 1 only, otherwise it is nil)- or
'boolean
or a compound list:
'(:list <type>)'(:array <type>)'(:hash-table <type>)
where <type> is a simple type.
Accessing a JSON request body
Hunchentoot
To read a request body, use hunchentoot:raw-post-data, to which you
can add :force-text t to always get a string (and not a vector of
octets).
Then you can parse this string to JSON with the library of your choice (jzon, shasht…).
(easy-routes route-api-demo ("/api/:id/update" :method :post) ()
   (let ((json (ignore-errors
                (jzon:parse (hunchentoot:raw-post-data :force-text t)))))
     (when json
        …)))
Error handling
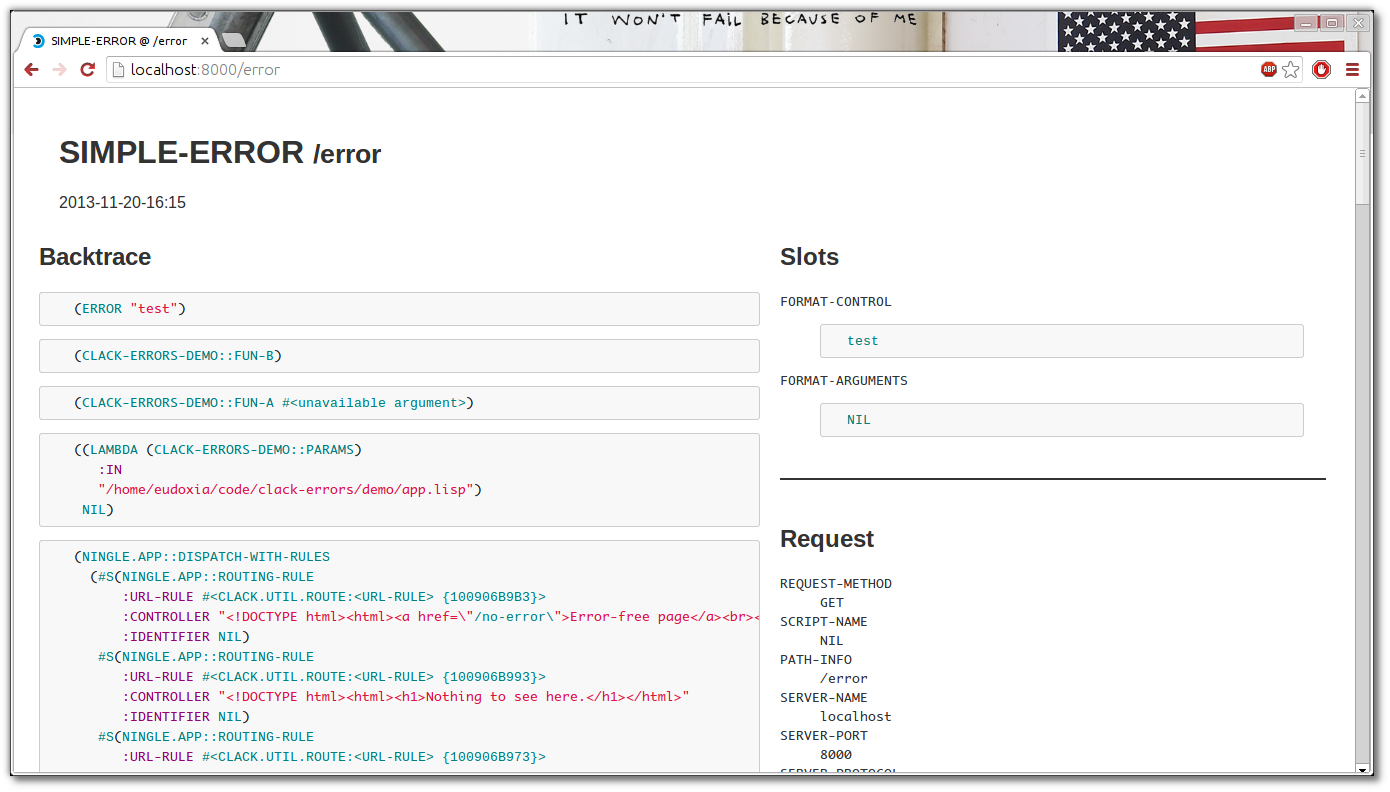
In all frameworks, we can choose the level of interactivity. The web framework can return a 404 page and print output on the repl, it can invoke the interactive lisp debugger, or it can handle the error and show the lisp backtrace on the html page.
Hunchentoot
The global variables to set to choose the error handling behaviour are:
*catch-errors-p*: set tonilif you want unhandled errors to invoke the interactive debugger (for development only, of course):
(setf hunchentoot:*catch-errors-p* nil)
See also the generic function maybe-invoke-debugger if you want to
fine-tune this behaviour. You might want to specialize it on specific
condition classes (see below) for debugging purposes.
*show-lisp-errors-p*: set totif you want to see errors in HTML output in the browser.*show-lisp-backtraces-p*: set tonilif the errors shown in HTML output (when*show-lisp-errors-p*ist) should not contain backtrace information (defaults tot, shows the backtrace).
Hunchentoot defines condition classes. The superclass of all
conditions is hunchentoot-condition. The superclass of errors is hunchentoot-error (itself a subclass of hunchentoot-condition).
See the documentation: https://edicl.github.io/hunchentoot/#conditions.
Clack
Clack users might make a good use of plugins, like the clack-errors middleware: https://github.com/CodyReichert/awesome-cl#clack-plugins.
Weblocks - solving the “JavaScript problem”©
Weblocks is a widgets-based and server-based framework with a built-in ajax update mechanism. It allows to write dynamic web applications without the need to write JavaScript or to write lisp code that would transpile to JavaScript.
Weblocks is an old framework developed by Slava Akhmechet, Stephen Compall and Leslie Polzer. After nine calm years, it is seeing a very active update, refactoring and rewrite effort by Alexander Artemenko.
It was initially based on continuations (they were removed to date) and thus a lispy cousin of Smalltalk’s Seaside. We can also relate it to Haskell’s Haste, OCaml’s Eliom, Elixir’s Phoenix LiveView and others.
The Ultralisp website is an example Weblocks website in production known in the CL community.
Weblock’s unit of work is the widget. They look like a class definition:
(defwidget task ()
   ((title
     :initarg :title
     :accessor title)
    (done
     :initarg :done
     :initform nil
     :accessor done)))
Then all we have to do is to define the render method for this widget:
(defmethod render ((task task))
  "Render a task."
  (with-html
        (:span (if (done task)
                   (with-html
                         (:s (title task)))
                 (title task)))))
It uses the Spinneret template engine by default, but we can bind any other one of our choice.
To trigger an ajax event, we write lambdas in full Common Lisp:
...
(with-html
  (:p (:input :type "checkbox"
    :checked (done task)
    :onclick (make-js-action
              (lambda (&key &allow-other-keys)
                (toggle task))))
...
The function make-js-action creates a simple javascript function
that calls the lisp one on the server, and automatically refreshes the
HTML of the widgets that need it. In our example, it re-renders one
task only.
Is it appealing ? Carry on this quickstart guide here: http://40ants.com/weblocks/quickstart.html.
Templates
Djula - HTML markup
Djula is a port of Python’s Django template engine to Common Lisp. It has excellent documentation.
Caveman uses it by default, but otherwise it is not difficult to setup. We must declare where our templates are with something like
(djula:add-template-directory (asdf:system-relative-pathname "webapp" "templates/"))
and then we can declare and compile the ones we use, for example::
(defparameter +base.html+ (djula:compile-template* "base.html"))
(defparameter +welcome.html+ (djula:compile-template* "welcome.html"))
A Djula template looks like this (forgive the antislash in {\%, this
is a Jekyll limitation):
{\% extends "base.html" \%}
{\% block title %}Memberlist{\% endblock \%}
{\% block content \%}
  <ul>
  {\% for user in users \%}
    <li><a href=""></a></li>
  {\% endfor \%}
  </ul>
{\% endblock \%}
At last, to render the template, call djula:render-template* inside a route.
(easy-routes:defroute root ("/" :method :get) ()
  (djula:render-template* +welcome.html+ nil
                          :users (get-users)
Note that for efficiency Djula compiles the templates before rendering them.
It is, along with its companion access library, one of the most downloaded libraries of Quicklisp.
Djula filters
Filters allow to modify how a variable is displayed. Djula comes with a good set of built-in filters and they are well documented. They are not to be confused with tags.
They look like this: ``, where lower is an
existing filter, which renders the text into lowercase.
Filters sometimes take arguments. For example: `` calls
the add filter with arguments value and 2.
Moreover, it is very easy to define custom filters. All we have to do
is to use the def-filter macro, which takes the variable as first
argument, and which can take more optional arguments.
Its general form is:
(def-filter :myfilter-name (value arg) ;; arg is optional
   (body))
and it is used like this: ``.
Here’s how the add filter is defined:
(def-filter :add (it n)
  (+ it (parse-integer n)))
Once you have written a custom filter, you can use it right away throughout the application.
Filters are very handy to move non-trivial formatting or logic from the templates to the backend.
Spinneret - lispy templates
Spinneret is a “lispy” HTML5 generator. It looks like this:
(with-page (:title "Home page")
  (:header
   (:h1 "Home page"))
  (:section
   ("~A, here is *your* shopping list: " *user-name*)
   (:ol (dolist (item *shopping-list*)
          (:li (1+ (random 10)) item))))
  (:footer ("Last login: ~A" *last-login*)))
The author finds it is easier to compose the HTML in separate functions and macros than with the more famous cl-who. But it has more features under it sleeves:
- it warns on invalid tags and attributes
- it can automatically number headers, given their depth
- it pretty prints html per default, with control over line breaks
- it understands embedded markdown
- it can tell where in the document a generator function is (see
get-html-tag)
Serve static assets
Hunchentoot
With Hunchentoot, use create-folder-dispatcher-and-handler prefix directory.
For example:
(push (hunchentoot:create-folder-dispatcher-and-handler
       "/static/" (merge-pathnames
                     "src/static" ; <-- starts without a /
                     (asdf:system-source-directory :myproject)))
      hunchentoot:*dispatch-table*)
Now our project’s static files located under
/path/to/myproject/src/static/ are served with the /static/ prefix:
<img src="/static/img/banner.jpg" />
Connecting to a database
Please see the databases section. The Mito ORM supports SQLite3, PostgreSQL, MySQL, it has migrations and db schema versioning, etc.
In Caveman, a database connection is alive during the Lisp session and is reused in each HTTP requests.
Checking a user is logged-in
A framework will provide a way to work with sessions. We’ll create a little macro to wrap our routes to check if the user is logged in.
In Caveman, *session* is a hash table that represents the session’s
data. Here are our login and logout functions:
(defun login (user)
  "Log the user into the session"
  (setf (gethash :user *session*) user))

(defun logout ()
  "Log the user out of the session."
  (setf (gethash :user *session*) nil))
We define a simple predicate:
(defun logged-in-p ()
  (gethash :user cm:*session*))
and we define our with-logged-in macro:
(defmacro with-logged-in (&body body)
  `(if (logged-in-p)
       (progn ,@body)
       (render #p"login.html"
               '(:message "Please log-in to access this page."))))
If the user isn’t logged in, there will nothing in the session store, and we render the login page. When all is well, we execute the macro’s body. We use it like this:
(defroute "/account/logout" ()
  "Show the log-out page, only if the user is logged in."
  (with-logged-in
    (logout)
    (render #p"logout.html")))

(defroute ("/account/review" :method :get) ()
  (with-logged-in
    (render #p"review.html"
            (list :review (get-review (gethash :user *session*))))))
and so on.
Encrypting passwords
With cl-bcrypt
cl-bcrypt is a password hashing and verification library. It is as simple to use as this:
;; Create a password object with 12 rounds:
(defparameter *password* (bcrypt:make-password "test" :cost 12 :identifier "2a"))
;; Generate a hash:
(bcrypt:password-hash *password*)
;; #(249 97 146 214 147 168 142 174 40 17 15 74 150 236 240 184 72 175 74 206 160 168 22)
;; String representation:
(defparameter *password-string* (bcrypt:encode *password*))
;; Check the password by comparing "test" to the stored string:
(bcrypt:password= "test" *password-string*)
;; T
(bcrypt:password= "correct horse battery staple" *password-string*)
;; NIL
Manually (with Ironclad)
In this recipe we do the encryption and verification ourselves. We use the de-facto standard Ironclad cryptographic toolkit and the Babel charset encoding/decoding library.
The following snippet creates the password hash that should be stored in your database. Note that Ironclad expects a byte-vector, not a string.
(defun password-hash (password)
  (ironclad:pbkdf2-hash-password-to-combined-string
   (babel:string-to-octets password)))
pbkdf2 is defined in RFC2898.
It uses a pseudorandom function to derive a secure encryption key
based on the password.
The following function checks if a user is active and verifies the entered password. It returns the user-id if active and verified and nil in all other cases even if an error occurs. Adapt it to your application.
(defun check-user-password (user password)
  (handler-case
      (let* ((data (my-get-user-data user))
             (hash (my-get-user-hash data))
             (active (my-get-user-active data)))
        (when (and active (ironclad:pbkdf2-check-password (babel:string-to-octets password)
                                                          hash))
          (my-get-user-id data)))
    (condition () nil)))
And the following is an example on how to set the password on the
database. Note that we use (password-hash password) to save the
password. The rest is specific to the web framework and to the DB
library.
(defun set-password (user password)
  (with-connection (db)
    (execute
     (make-statement :update :web_user
                     (set= :hash (password-hash password))
                     (make-clause :where
                                  (make-op := (if (integerp user)
                                                  :id_user
                                                  :email)
                                           user))))))
Credit: /u/arvid on /r/learnlisp.
Runnning and building
Running the application from source
To run our Lisp code from source, as a script, we can use the --load
switch from our implementation.
We must ensure:
- to load the project’s .asd system declaration (if any)
- to install the required dependencies (this demands we have installed Quicklisp previously)
- and to run our application’s entry point.
We could use such commands:
;; run.lisp

(load "myproject.asd")

(ql:quickload "myproject")

(in-package :myproject)
(handler-case
    ;; The START function starts the web server.
    (myproject::start :port (ignore-errors
                              (parse-integer
                                (uiop:getenv "PROJECT_PORT"))))
  (error (c)
    (format *error-output* "~&An error occurred: ~a~&" c)
    (uiop:quit 1)))
In addition we have allowed the user to set the application’s port with an environment variable.
We can run the file like so:
sbcl --load run.lisp
After loading the project, the web server is started in the background. We are offered the usual Lisp REPL, from which we can interact with the running application.
We can also connect to the running application from our preferred editor, from home, and compile the changes in our editor to the running instance. Read below in “Connecting to a remote Lisp image”.
Building a self-contained executable
As for all Common Lisp applications, we can bundle our web app in one single executable, including the assets. It makes deployment very easy: copy it to your server and run it.
$ ./my-web-app
Hunchentoot server is started.
Listening on localhost:9003.
See this recipe on scripting#for-web-apps.
Continuous delivery with Travis CI or Gitlab CI
Please see the section on testing#continuous-integration.
Multi-platform delivery with Electron
Once you built a binary of your web application, you can point an Electron window to it.
Ceramic is a collection of tools that make all the work for us.
It is as simple as this:
;; Load Ceramic and our app
(ql:quickload '(:ceramic :our-app))

;; Ensure Ceramic is set up
(ceramic:setup)
(ceramic:interactive)

;; Start our app (here based on the Lucerne framework)
(lucerne:start our-app.views:app :port 8000)

;; Open a browser window to it
(defvar window (ceramic:make-window :url "http://localhost:8000/"))

;; start Ceramic
(ceramic:show-window window)
and we can ship this on Linux, Mac and Windows.
There is more:
Ceramic applications are compiled down to native code, ensuring both performance and enabling you to deliver closed-source, commercial applications.
Thus, no need to minify our JS.
Deployment
Deploying manually
We can start our executable in a shell and send it to the background (C-z bg), or run it inside a tmux session. These are not the best but hey, it works©.
Systemd: Daemonizing, restarting in case of crashes, handling logs
This is actually a system-specific task. See how to do that on your system.
Most GNU/Linux distros now come with Systemd, so here’s a little example.
Deploying an app with Systemd is as simple as writing a configuration file:
$ sudo emacs -nw /etc/systemd/system/my-app.service
[Unit]
Description=your lisp app on systemd example

[Service]
WorkingDirectory=/path/to/your/project/directory/
ExecStart=/usr/bin/make run  # or anything
Type=simple
Restart=on-failure

[Install]
WantedBy=network.target
Then we have a command to start it, only now:
sudo systemctl start my-app.service
and a command to install the service, to start the app after a boot or reboot (that’s the “[Install]” part):
sudo systemctl enable my-app.service
Then we can check its status:
systemctl status my-app.service
and see our application’s logs (we can write to stdout or stderr, and Systemd handles the logging):
journalctl -u my-app.service
(you can also use the -f option to see log updates in real time, and in that case augment the number of lines with -n 50 or --lines).
Systemd handles crashes and restarts the application. That’s the Restart=on-failure line.
Now keep in mind a couple things:
- your main thread has to be kept active, otherwise Systemd will
successfully start your app, think that nothing is happening, and it
will successfully stop your app. If your app offers a Lisp REPL upon
start, this is not enough.
- see how we keep our web server thread active in this recipe on scripting#for-web-apps.
- then, if you want to connect to the running Lisp image, in that case where you don’t have access to your app’s REPL, use a Swank server.
- we want our app to crash so that it can be re-started automatically:
you’ll want the
--disable-debuggerflag with SBCL. - Systemd will, by default, run your app as root. If you rely on your
Lisp to read your startup file (
~/.sbclrc), especially to setup Quicklisp, you will need to use the--userinitflag, or to set the Systemd user withUser=xyzin the[service]section. And if you use a startup file, be aware that the line(user-homedir-pathname)will not return the same result depending on the user, so the snippet might not find Quicklisp’s setup.lisp file.
See more: https://www.freedesktop.org/software/systemd/man/systemd.service.html.
With Docker
There are several Docker images for Common Lisp. For example:
- clfoundation/sbcl includes the latest version of SBCL, many OS packages useful for CI purposes, and a script to install Quicklisp.
- 40ants/base-lisp-image is based on Ubuntu LTS and includes SBCL, CCL, Quicklisp, Qlot and Roswell.
- container-lisp/s2i-lisp is CentOs based and contains the source for building a Quicklisp based Common Lisp application as a reproducible docker image using OpenShift’s source-to-image.
With Guix
GNU Guix is a transactional package manager, that can be installed on top of an existing OS, and a whole distro that supports declarative system configuration. It allows to ship self-contained tarballs, which also contain system dependencies. For an example, see the Nyxt browser.
Running behind Nginx
There is nothing CL-specific to run your Lisp web app behind Nginx. Here’s an example to get you started.
We suppose you are running your Lisp app on a web server, with the IP address 1.2.3.4, on the port 8001. Nothing special here. We want to access our app with a real domain name (and eventuall benefit of other Nginx’s advantages, such as rate limiting etc). We bought our domain name and we created a DNS record of type A that links the domain name to the server’s IP address.
We must configure our server with Nginx to tell it that all connections coming from “your-domain-name.org”, on port 80, are to be sent to the Lisp app running locally.
Create a new file: /etc/nginx/sites-enabled/my-lisp-app.conf and add this proxy directive:
server {
    listen www.your-domain-name.org:80;
    server_name your-domain-name.org www.your-domain-name.org;  # with and without www
    location / {
        proxy_pass http://1.2.3.4:8001/;
    }

    # Optional: serve static files with nginx, not the Lisp app.
    location /files/ {
        proxy_pass http://1.2.3.4:8001/files/;
    }
}
Note that on the proxy_pass directive: proxy_pass
http://1.2.3.4:8001/; we are using our server’s public IP
address. Often, your Lisp webserver such as Hunchentoot directly
listens on it. You might want, for security reasons, to run the Lisp
app on localhost.
Reload nginx (send the “reload” signal):
$ nginx -s reload
and that’s it: you can access your Lisp app from the outside through http://www.your-domain-name.org.
Deploying on Heroku and other services
See heroku-buildpack-common-lisp and the Awesome CL#deploy section for interface libraries for Kubernetes, OpenShift, AWS, etc.
Monitoring
See Prometheus.cl for a Grafana dashboard for SBCL and Hunchentoot metrics (memory, threads, requests per second,…).
Connecting to a remote Lisp image
This this section: debugging#remote-debugging.
Hot reload
This is an example from Quickutil. It is actually an automated version of the precedent section.
It has a Makefile target:
hot_deploy:
	$(call $(LISP), \
		(ql:quickload :quickutil-server) (ql:quickload :swank-client), \
		(swank-client:with-slime-connection (conn "localhost" $(SWANK_PORT)) \
			(swank-client:slime-eval (quote (handler-bind ((error (function continue))) \
				(ql:quickload :quickutil-utilities) (ql:quickload :quickutil-server) \
				(funcall (symbol-function (intern "STOP" :quickutil-server))) \
				(funcall (symbol-function (intern "START" :quickutil-server)) $(start_args)))) conn)) \
		$($(LISP)-quit))
It has to be run on the server (a simple fabfile command can call this
through ssh). Beforehand, a fab update has run git pull on the
server, so new code is present but not running. It connects to the
local swank server, loads the new code, stops and starts the app in a
row.
See also
- Web Apps in Lisp, Know-how
- lisp-web-template-productlist, a simple project template with Hunchentoot, Easy-Routes, Djula and Bulma CSS.
- lisp-web-live-reload-example - a toy project to show how to interact with a running web app.
- video: how to build a web app in Lisp · part 1 featuring Hunchentoot, easy-routes, Djula templates, error handling, common traps.
- Building a TLS 1.3 implementation in Common Lisp
- Automatic TLS Certificates for Common Lisp with pure-tls/acme
Credits
Page source: web.md